
Installing the BYODt Deployment
This guide takes you from an empty machine to a running Dethernety deployment that you control. When you finish, you have:
- The platform at
http://127.0.0.1:3000, where you build and analyse threat models. - The operator console at
http://127.0.0.1:3000/console/, which reports the deployment's health. - A graph database (Memgraph by default, or Neo4j) holding your models, with the MITRE ATT&CK, ATLAS and D3FEND reference data already loaded.
Time to allow: 30 minutes to an hour for the first install, most of it unattended download time. The first start pulls four container images, installs the signed modules, loads the reference data, and downloads the embedding model's weights (about 1.26 GB). Every later start takes well under a minute.
At a glance
If your machine already meets the requirements, there are three ways to install. The commands below use the current release; newer releases are listed on the releases page.
From the first release that ships it, each release has an installer, get-byodt.sh. One command downloads the bundle, checks it, unpacks it into ./byodt, and asks you a few questions. The first two ways run that installer; they differ only in how it reaches you.
With npx (recommended if you have Node.js). The npm package carries the release's own get-byodt.sh and runs it. Use it if Node.js 18 or later is already installed, or you are happy to install it. Node.js runs the installer only: the deployment itself never needs it. If you will run the Dethereal Claude Code plugin on the same machine, you have Node.js already: its MCP server is launched with npx and needs Node.js 20 or later, which also meets the installer's 18 (see Getting started with Dethereal).
npx @dether.net/byodt@0.14.0
With get-byodt.sh from the release. The same installer, with no Node.js at all:
VERSION=0.14.0
curl --proto '=https' --tlsv1.2 -fsSL "https://github.com/dether-net/dethernety-oss/releases/download/v${VERSION}/get-byodt.sh" | sh
A release reaches npm in a separate step after it is published on GitHub; for a version that is not on npm yet, use get-byodt.sh. See Install with the installer for what it checks, its options, and how to run it without a terminal. A release without get-byodt.sh installs by hand.
By hand. These commands are the whole installation:
VERSION=0.14.0
BASE="https://github.com/dether-net/dethernety-oss/releases/download/v${VERSION}"

# 1. Download the bundle and its signature
curl -fsSLO "${BASE}/byodt-${VERSION}.tar.gz"
curl -fsSLO "${BASE}/byodt-${VERSION}.tar.gz.bundle"

# 2. Verify the signature (needs cosign)
cosign verify-blob "byodt-${VERSION}.tar.gz" \
  --bundle "byodt-${VERSION}.tar.gz.bundle" \
  --certificate-identity "https://github.com/dether-net/dethernety-oss/.github/workflows/release.yml@refs/tags/v${VERSION}" \
  --certificate-oidc-issuer https://token.actions.githubusercontent.com

# 3. Extract it somewhere durable, and enter the directory
tar xzf "byodt-${VERSION}.tar.gz"
cd "byodt-${VERSION}"

# 4. Start it (first-run setup included)
./byodt up

# 5. Open the console and check for a Healthy verdict
./byodt console
Important: Two choices cannot easily be changed after the first start: the database engine (Memgraph or Neo4j) and, on a VM-backed runtime, where the database stores its data. A VM-backed runtime is one that runs containers in a virtual machine, such as Docker Desktop, or a Podman machine on macOS or Windows; Docker Engine or Podman running directly on Linux is not. If either choice applies to you, read Optional: choose your settings first before step 4.
Note: If the machine reaches the internet only through an outbound proxy, these commands are not enough on their own. Follow Behind an outbound proxy instead.
The rest of this guide walks through each step, explains what the first start does, and shows what a healthy deployment looks like.
Before you start
Requirements
| Requirement | What you need |
|---|---|
| Container engine | Docker with the Compose plugin, or Podman 4.1+ with a Compose provider. Podman brokers to Docker Compose v2 when it is present, otherwise to podman-compose. |
| Disk | Several gigabytes free in the directory you extract the bundle into: four container images, the embedding model's weights (about 1.26 GB in data/models), the database's data, and the reference data. |
| Memory | Enough for the database plus the platform. Memgraph runs with a 4096 MiB memory limit — the measured floor for the reference-data ingest. Neo4j runs with a 2 GB heap and a 1 GB page cache, plus what the JVM needs beyond those. The platform holds the embedding model in memory, which adds roughly 0.8–0.9 GiB. |
| CPU | No fixed minimum. The timings in this guide are for a 4-vCPU host, which matches the embedder's default of 4 inference threads (EMBEDDING_THREADS; see Configuration → Embedding). |
| Network (first start and upgrades) | Access to the container registries, GitHub release assets, and Hugging Face, directly or through an outbound proxy. See Network access for the first start. |
| For the installer | Linux or macOS (on Windows, inside WSL), with sh, tar, curl (or wget), and sha256sum or shasum. Through npx, Node.js 18 or later too, to run the installer only. |
| Node.js | Not needed by the deployment: its services run in containers, and byodt is a shell script. Only the npx way of running the installer needs Node.js on the host. |
For byodt | sha256sum or shasum too. byodt needs one to record your confirmation of the third-party notice, and to upgrade; other commands do not. Without one, the notice counts as not yet confirmed, so a first start, and any up, update, restart or models pull run at a terminal or with --yes, asks for it and then stops. See Troubleshooting. |
| Optional tools | cosign to verify the bundle's signature; the installer and ./byodt upgrade use it when it is installed. curl for the health checks. |
Warning: If you run a VM-backed runtime — one that runs containers in a virtual machine, such as Docker Desktop, or a Podman machine on macOS or Windows — the memory that counts is the memory the virtual machine is allowed, not the host's. If the VM is capped at 4 GB or less, raise it in the runtime's settings before you start. The reference-data ingest is deliberately not retried when the database runs out of memory. Docker Engine on Linux runs containers directly on the host, so the host's memory is what counts there.
Check your container engine
The control script runs <engine> compose, so that exact command must work. Check whichever engine you have:
docker compose version
podman compose version
Use whichever prints a version. If neither does, install the missing piece: a bare engine without a Compose provider is not enough.
On the first start, the script detects the engine (Docker first, then Podman) and records the choice in .env as CONTAINER_ENGINE, so every later command uses the same one. To force a specific engine, see Configuration → Container engine.
Podman specifics
Podman works fully, with Docker Compose v2 or with podman-compose: installing, backing up, restoring and upgrading included. (An upgrade from 0.12.x or 0.13.0 on Memgraph and podman-compose needs one step by hand; see Operations → Upgrading on Podman.) Four things to know:
- On macOS, start the machine first. Podman runs containers inside a virtual machine that is not started for you:Shell
podman machine start
Without it, everybyodtcommand stops with an error saying that the engine's compose is not usable. See Troubleshooting. - Use the named volume for database storage on a VM-backed runtime. On macOS or Windows, a Podman machine is one; see the warning in Optional: choose your settings first.
- Rootless is expected. The containers write into the bundle's runtime directories under an unprivileged user id that does not match yours, so the control script creates those directories world-writable on every start. You do not need to do anything. Do not tighten them by hand: the next start widens them again.
- On a host that also has Docker, choose the Compose provider. This applies when
byodtruns Podman: withCONTAINER_ENGINE=podman, or when Docker'sdocker composedoes not work, sincebyodttries Docker first.podman composeruns Docker'sdocker-composewhen it finds it, anddocker-composereaches Podman only through the Podman API socket. Without the socket running, the first start fails with a message such asfailed to connect to the docker API at unix:///run/user/<uid>/podman/podman.sock. To have Podman usepodman-compose, set this in the shell you runbyodtfrom, and in your shell profile so that it stays set:Shellexport PODMAN_COMPOSE_PROVIDER=podman-compose
Or keepdocker-composeand start the socket:systemctl --user start podman.socket.
Network access for the first start
The first start needs to reach these destinations, directly or through an outbound proxy. Behind a proxy, the proxy must allow the hosts in the second column. They are the hosts seen at the time of writing; the services behind them can change them.
| Destination | Hosts the proxy must allow | What for |
|---|---|---|
| GitHub's container registry | ghcr.io, pkg-containers.githubusercontent.com | The platform and console images. |
| The publishers' registries (Docker Hub by default) | registry-1.docker.io, auth.docker.io | The database and front-door images. |
github.com and its release-asset host | github.com, release-assets.githubusercontent.com | The bundle and its signature, and the signed module payloads for the release you are installing. |
| The npm registry, only when you install with npx | registry.npmjs.org | The installer's npm package. |
huggingface.co and the host it redirects downloads to | huggingface.co, and its download host, for example us.aws.cdn.hf.co | The embedding model's weights. The platform verifies each file's sha256 before it uses it. |
| In cloud mode: the content service and identity provider your cloud connection names | Their hosts | Sign-in, content packages, and the knowledge graph. Needed in use, not only on the first start. |
About the second column:
- The model's download host can vary. The hub redirects each download to a CDN host, and a machine elsewhere can be sent to another one. Allow the one your machine is sent to;
./byodt models pullnames it when it is blocked. - Docker Hub layers. The host Docker Hub downloads image layers from is not listed here. Check your registry's documentation, or your mirror's, for the hosts a first pull needs.
- A mirror replaces the registry. An image you repoint at a registry you operate (
DB_IMAGE,NEO4J_IMAGE,PROXY_IMAGE,CONSOLE_IMAGE) comes from that registry's host instead. - cosign runs in your shell, not in the deployment. It may need to reach Sigstore's public services on first use.
Module signatures are verified offline: the trusted root is embedded in the console image, so no signing service is contacted.
Later starts need none of this until the next upgrade, which pulls new images, fetches the new release's modules, and may download new weights. console-init still asks the release host on every start. When it cannot reach it, the console reports Module Fetch Failed, and the modules already on disk stay in use. In cloud mode, the content service and the identity provider are needed all along.
If the machine sits behind an allowlist, open these destinations before the first start rather than debugging a half-finished one.
Note: If the machine reaches the internet only through an outbound proxy, follow Behind an outbound proxy before you start. If it has no internet access at all, place the weights by hand; see Hosts without internet access.
Behind an outbound proxy
Skip this section if the machine reaches the internet directly.
If its only way out is an HTTP proxy, set the proxy up in the order below. Three different places hold the setting, and each step checks one path through the proxy before the next step depends on it.
| Step | What goes through the proxy | Where the setting lives |
|---|---|---|
| 1 | Image pulls | The container engine's own configuration |
| 2 | Downloading and verifying the bundle | HTTPS_PROXY in your shell |
| 3 | console-init, the platform and the console | .env, .env.secrets and proxy-ca/ in the bundle |
| 4 | The model download, as a test | Step 3's setting |
| 5 | The first start | Steps 1 and 3 |
Note: Proxies that need NTLM or Kerberos login are not supported: Go and Node, which the deployment's services run on, support neither.
The full reference for the deployment's own setting is Configuration → Outbound proxy.
1. Give the container engine the proxy
Your container engine pulls the images itself. It never reads the deployment's .env, so it needs a proxy setting of its own.
Docker. The Docker daemon pulls, and it reads only its own proxy setting, never your shell's. Set it in one of two places:
- A systemd drop-in, for example
/etc/systemd/system/docker.service.d/http-proxy.conf:INI[Service] Environment="HTTPS_PROXY=http://proxy.example.internal:3128" Environment="NO_PROXY=localhost,127.0.0.1"
A%in a unit file is written%%. A login percent-encoded asuser:pa%23ssis therefore writtenuser:pa%%23ssin the drop-in. proxiesin/etc/docker/daemon.json, on Docker Engine 23.0 or later:JSON{ "proxies": { "https-proxy": "http://proxy.example.internal:3128", "no-proxy": "localhost,127.0.0.1" } }
Then reload systemd, restart the daemon, and check what it reports:
sudo systemctl daemon-reload
sudo systemctl restart docker
docker info --format '{{.HTTPSProxy}}'    # the proxy, with any login masked
Warning: Restarting the Docker daemon stops every container on the host, unless
live-restoreis enabled. Containers set to restartalwaysorunless-stopped, as the deployment's services are, start again on their own. Restart any others yourself.
Note: systemd shows a unit's environment to every local account (
systemctl show docker). If the proxy needs a login, put it indaemon.jsonwith mode0600rather than in a drop-in.
If you run Docker Desktop rather than Docker Engine, the systemd drop-in and daemon.json above do not apply: set and check the proxy in Docker Desktop's own settings instead. byodt's daemon check reads docker info, which may not reflect that setting.
Podman. Which process pulls depends on the Compose provider (see Check your container engine):
- With
podman-compose, thepodmancommand pulls, under your account. It followsHTTPS_PROXYin your shell, orenvunder[engine]incontainers.conf(~/.config/containers/containers.conffor rootless Podman):TOML[engine] env = ["https_proxy=http://proxy.example.internal:3128"] - With Docker Compose v2, the Podman API service (
podman.service, started bypodman.socket) pulls. It follows its systemd unit's environment. Add the same[Service]lines as for Docker, then restart it:Shellsystemctl --user edit podman.service # rootless Podman; add the [Service] lines systemctl --user restart podman.service
byodt checks the Docker daemon's setting, and warns when it is missing (step 5). It does not check Podman's.
Do not use ~/.docker/config.json for this. Its proxies setting does not configure pulls. Instead, the Docker client copies it into every container it creates. The deployment sets every proxy variable of its own containers explicitly, so the copy no longer reaches them, but it still reaches any other container you run. Podman copies your shell's proxy variables into containers by default (http_proxy = true in containers.conf); the same explicit values keep them out of the deployment's containers.
If the proxy inspects TLS, the engine must trust the proxy's CA as well. Add the CA to the host's trust store (on Debian or Ubuntu, copy it into /usr/local/share/ca-certificates/ as a .crt file and run sudo update-ca-certificates), then restart the Docker daemon or the Podman API service. The deployment's own proxy-ca/ (step 3) does not reach the engine.
Check it with a plain pull of two images the deployment uses. The console's tag is the release's version, as in the commands above; use podman pull on Podman:
docker pull ghcr.io/dether-net/byodt-console:0.14.0
docker pull docker.io/nginx:1.27-alpine
The second is the front-door image. PROXY_IMAGE in the release's .env.example names the tag it uses.
2. Get the bundle through the proxy
curl and cosign run in your shell and follow HTTPS_PROXY there. Export it, then follow Get the bundle as written:
export HTTPS_PROXY=http://proxy.example.internal:3128
cosign may need to reach Sigstore's public services on first use.
If the proxy needs a login, put it in the URL, percent-encoded: http://user:password@proxy.example.internal:3128. Typed on the command line, it lands in your shell's history. To keep it out, read the login into a variable without echoing it, then build the URL from it:
read -rs PROXY_LOGIN    # type user:password, percent-encoded, then Enter
export HTTPS_PROXY="http://${PROXY_LOGIN}@proxy.example.internal:3128"
unset PROXY_LOGIN
The login then sits in your shell's environment. Run unset HTTPS_PROXY when you are done, unless podman-compose pulls with it (step 1).
The installer follows the same HTTPS_PROXY, login included, and hands the proxy URL to ./byodt setup as its --https-proxy, so setup writes it into .env without asking for it; of the login, setup only offers to save it (step 3). See Install with the installer → Through an outbound proxy.
The deployment does not use this shell value. It uses only the proxy .env names (step 3). When your shell sets a different one, byodt prints a notice, with any login masked, and goes on with .env's:
==> Your shell sets HTTPS_PROXY (…); the stack uses only the one in .env (…). Set HTTPS_PROXY in .env to change it.
3. Set the proxy for the deployment
With ./byodt setup (the installer runs it for you), answer its proxy questions, or give its proxy flags: it writes HTTPS_PROXY and NO_PROXY into .env, the login into .env.secrets, and the CA into proxy-ca/, and checks them as every later command does. See Set up with ./byodt setup. Then go on with step 4. The rest of this step does the same by hand.
From the bundle directory, create .env first. The first start creates it from .env.example only when it is missing, and a .env without the proxy sends everything direct:
cp .env.example .env
The proxy. In .env, set HTTPS_PROXY. The "Outbound proxy" section of the file has the line commented out:
HTTPS_PROXY=http://proxy.example.internal:3128
- Write it as
http://host:port. Most proxies takehttp://here. The scheme is only how the services talk to the proxy; the HTTPS connections they make through it stay HTTPS. - Do not use
localhostor127.0.0.1: inside a container, that is the container itself. For a proxy on this host, use the host's address on the network the proxy listens on. The name must resolve inside the containers. - Leave the login out.
byodtrefuses a.envproxy URL that carries one. - Add
NO_PROXYonly for hosts the deployment calls that must bypass the proxy, such as a LangGraph server onhttps://. List exact host names: an entry does not cover its subdomains. See Configuration → Outbound proxy.
The login, if the proxy needs one, goes in .env.secrets, never in .env. Create the file readable by you only, if it does not exist yet:
touch .env.secrets && chmod 0600 .env.secrets
Then add this line with an editor, with the user name and the password percent-encoded (# as %23, @ as %40, : as %3A; the full list is in Configuration → The outbound proxy's login):
HTTPS_PROXY_USERINFO=user:password
The first start adds the database password to the same file and keeps your line.
The CA, if the proxy inspects TLS (it re-signs every HTTPS connection with a CA of its own). Put the CA certificate in proxy-ca/proxy-ca.pem, the only file in that directory:
mkdir -p -m 0755 proxy-ca
cp /path/to/the-proxy-ca.pem proxy-ca/proxy-ca.pem
chmod 0644 proxy-ca/proxy-ca.pem
byodt creates proxy-ca/ on the first run anyway; mkdir -p lets you place the file before that, and changes nothing when the directory is already there.
Warning: Trusting that CA lets whoever holds its key read and change everything the deployment sends over TLS. That includes the signing keys sign-ins are checked against, so they can sign anyone in. First ask the proxy's operators to pass the identity provider and the content service through uninspected; use the CA file only if they cannot. See Configuration → A proxy that inspects TLS.
4. Test it with the model download
./byodt models pull
This is the first call through the deployment's proxy setting, before anything else starts. It runs the platform's own download code with the platform's environment: the proxy, its login, NO_PROXY and the CA file. It downloads the embedding model's weights (about 1.26 GB) from the model hub and its download host, so the first start then skips that step.
Result: it ends with Ready: the platform loads the model from there without downloading it. On a failure, the message names the host that failed, for example The weights could not be placed: …: request to <host> failed: fetch failed. That is all its own output shows of a network failure. The underlying cause appears only when the platform downloads the model itself, on a start: ./byodt logs platform then shows it as the cause of each weight acquisition failed, retrying entry. See Troubleshooting → Behind an outbound proxy.
models pull also performs first-run setup, so .env must hold the proxy before you run it (step 3).
5. Start the deployment
./byodt up
Then check the deployment as in Verify the deployment is healthy. Every module reading placed in the console shows that console-init reached the release host through the proxy.
On Docker, when .env names a proxy and the daemon has none, ./byodt up and ./byodt update warn before they pull:
warning: HTTPS_PROXY is set in .env, but the Docker daemon has no proxy of its own, so image pulls go direct. If this host has no direct route out, set the daemon's proxy (a systemd drop-in, or "proxies" in daemon.json), restart it, and run the command again.
The warning does not stop the start: a registry mirror on your own network pulls without a proxy. If yours does not, go back to step 1.
Install with the installer
From the first release that ships it, each release publishes an installer, get-byodt.sh, beside its bundle; a release without one installs by hand (see Get the bundle). It downloads that release's bundle, checks it, unpacks it into a new folder, and hands over to the bundle's own ./byodt setup. It also upgrades an existing deployment to its release; see Operations → Upgrading to a new release.
There are two ways to run it, and both run the same script, with the same options and the same questions:
| Way | Use it when | Needs, beyond the installer's tools |
|---|---|---|
| With npx (recommended) | Node.js is already installed, for example for Dethereal (20 or later), or you are happy to install it | Node.js 18 or later, to run the installer only. The deployment does not need it. |
With get-byodt.sh from the release | You would rather not have Node.js | Nothing more |
Everything after these two sections applies to both.
With npx
The npm package runs the release's own installer. Each package version is the release of the same version, and carries that release's get-byodt.sh with the same pins written in. The package's name:
PKG=@dether.net/byodt
npx "$PKG@0.14.0"
npx "$PKG@0.14.0" --dir ~/dethernety --yes
- Name the version. Without
@X.Y.Z,npxruns the latest release. - Options go after the package name, and reach the installer. An option before it is one of npx's own: npx asks
Ok to proceed?before it downloads a package it has not cached, andnpx --yes "$PKG@0.14.0"skips that question. Without a terminal, npx does not ask. - It runs the package's
get-byodt.shwith/bin/sh, and nothing else. It takes the same options, and asks at the terminal the same way. - It needs Node.js 18 or later, to run the installer only: the deployment it installs does not use Node.js. On Windows it stops with
Dethernety's self-hosted deployment runs on Linux or macOS. On Windows, run this inside WSL. - It takes npm's
node_modules/.binfolders out ofPATHbefore it starts the installer, socurl,cosign,tarand the container engine are always the system's. - A release reaches npm separately. Publishing to npm is a separate step after the release is published on GitHub. For a version that is not on npm yet, use
get-byodt.shfrom the release.
With get-byodt.sh from the release
Without Node.js, download the installer straight from the release and run it:
VERSION=0.14.0
curl --proto '=https' --tlsv1.2 -fsSL "https://github.com/dether-net/dethernety-oss/releases/download/v${VERSION}/get-byodt.sh" | sh
Options go after sh -s --:
curl --proto '=https' --tlsv1.2 -fsSL "https://github.com/dether-net/dethernety-oss/releases/download/v${VERSION}/get-byodt.sh" | sh -s -- --dir ~/dethernety
- Use the URL with the version in it. The script carries its release's version and the SHA-256 of that release's bundle, written in when the release was published, so the URL decides exactly what is installed.
- It installs into
./byodt, in the directory you run it from, unless you name another folder with--dir. The folder must not exist yet. It becomes the deployment, so put it somewhere durable (see the warning in Get the bundle). - The questions come from the terminal, even when the script itself arrives through a pipe.
To check the installer itself before you run it, download it with its signature and verify it as you would the bundle:
BASE="https://github.com/dether-net/dethernety-oss/releases/download/v${VERSION}"
curl --proto '=https' --tlsv1.2 -fsSLO "${BASE}/get-byodt.sh"
curl --proto '=https' --tlsv1.2 -fsSLO "${BASE}/get-byodt.sh.bundle"
cosign verify-blob get-byodt.sh \
  --bundle get-byodt.sh.bundle \
  --certificate-identity "https://github.com/dether-net/dethernety-oss/.github/workflows/release.yml@refs/tags/v${VERSION}" \
  --certificate-oidc-issuer https://token.actions.githubusercontent.com
sh get-byodt.sh
What it checks
For a new install, in this order, stopping at the first check that fails (an upgrade is described in Operations):
- The machine. Linux or macOS, with
tar. On Windows, run it inside WSL. - An existing deployment. It never installs over one; see When a deployment is already there.
- The target folder. It must not exist yet, and its parent must be a directory no other account can change (see Folders other accounts can change).
- The third-party notice. It is shown before anything is downloaded, and you confirm it (see The third-party notice):
Nothing has been downloaded yet. Continue? [y/N] - The download.
byodt-X.Y.Z.tar.gz, over HTTPS only, and at most 50 MiB: a larger file is not a release's. It needscurlorwget; with neither, it stops here:Neither curl nor wget is installed. - The SHA-256. It must equal the one written into the installer. It needs
sha256sumorshasum; with neither, it stops here.==> SHA-256 matches the release (…). - The signature, when cosign is installed. The installer downloads
byodt-X.Y.Z.tar.gz.bundleand verifies it against the exact signing identity: the release workflow ofdether-net/dethernety-ossat the tagvX.Y.Z,https://github.com/dether-net/dethernety-oss/.github/workflows/release.yml@refs/tags/vX.Y.Z, issued byhttps://token.actions.githubusercontent.com. An asset from any other release, or signed by anything else, does not pass.==> Signature verified: the release workflow of dether-net/dethernety-oss at vX.Y.Z signed it.
Without cosign it goes on, and says so:warning: cosign is not installed: the bundle's integrity was checked, its authenticity was not. Install cosign to verify the signature too. - What is inside. Every entry must sit under
byodt-X.Y.Z/, be a plain file or directory, and not be something that belongs to a deployment rather than a release, such as.env,.env.secretsordata/. It is unpacked in a private working folder beside the target, with nothing writable by other accounts, and moved into place:==> Unpacked release X.Y.Z into ./byodt.
Then it runs ./byodt setup in the new folder, at your terminal, with the options you gave it. Setup does not show the notice again, unless an image it names points at a mirror of your own (see The third-party notice).
Options
| Option | What it does |
|---|---|
--dir DIR | The folder to install into (default ./byodt), or the deployment to upgrade. |
--upgrade | Upgrade the deployment found. Needed when there is no terminal to ask, and with --yes. |
--yes | Ask nothing: take the defaults, and count the third-party notice as confirmed. The notice is printed either way. |
--https-proxy URL | The proxy for this download, as http://host:port, with no login in it. Default: your shell's HTTPS_PROXY. See Through an outbound proxy. |
--tarball FILE | Install from this bundle file instead of downloading it. It is checked all the same; its signature only from FILE.bundle beside it. |
--require-signature | Refuse unless cosign is installed and verifies the bundle. |
--allow-unsigned | Go ahead without a signature check when cosign is not installed, or a --tarball has no .bundle beside it, without asking about the signature. The SHA-256 is still checked, but it comes from the same release, so it shows the download is intact, not who made it. A signature cosign rejects always stops the upgrade. Refused when .env sets UPGRADE_REQUIRE_SIGNATURE=true. A new install ignores it. |
-h, --help | Print the options. |
Any other option goes to the bundle's own ./byodt setup (on a new install) or ./byodt upgrade (on an upgrade). For example, --db neo4j --start reaches setup. The installer passes on only values made of letters, digits and . _ : / @ % + , = ~ ! & ' ( ) * ; -.
Without a terminal
From a script or a provisioning tool, nobody can answer the questions. Then:
- Without
--yes, the installer prints the notice and stops before it downloads anything:error: There is no terminal to confirm the notice above on. Run this at a terminal, or add --yes. - With
--yes, it prints the notice, counts it as confirmed, and setup takes its defaults and your flags:Shellcurl --proto '=https' --tlsv1.2 -fsSL "https://github.com/dether-net/dethernety-oss/releases/download/v${VERSION}/get-byodt.sh" \ | sh -s -- --yes --dir ~/dethernety --db neo4j --start
Through npx, the same options follow the package name:Shellnpx "$PKG@0.14.0" --yes --dir ~/dethernety --db neo4j --start==> --yes: counted as the confirmation of the notice above.
--yes means unattended at a terminal too: nothing is asked. With --yes, or without a terminal, an existing deployment is upgraded only with --upgrade (at a terminal without --yes, the installer asks), and an upgrade goes ahead without a signature check (cosign not installed, or a --tarball with no .bundle beside it) only with --allow-unsigned. --yes never implies either.
Through an outbound proxy
The installer's own downloads (the bundle and its signature, and cosign's calls) go through the proxy in your shell's HTTPS_PROXY (or https_proxy), or through --https-proxy:
- A login comes only from the environment. Put it in
HTTPS_PROXY, percent-encoded, as in Behind an outbound proxy → 2.--https-proxyrefuses one, because an argument shows in the process list:error: Give --https-proxy without a login (http://host:port): an argument shows in the process list. A login comes only from HTTPS_PROXY in the environment. - The proxy is
http://host:port(orhttps://host:port), with nothing after the port. - The login never reaches a command line. The proxy reaches
curl,wgetandcosignthrough their environment, and the installer prints it masked:==> Downloading byodt-X.Y.Z.tar.gz from the dether-net/dethernety-oss release (through http://***@proxy.example.internal:3128)… - Through npx, npm downloads the package through the same
HTTPS_PROXYfrom your shell, and the installer inherits it. The proxy must then allow npm's registry,registry.npmjs.org, too.--https-proxyreaches the installer only, not npm.
curl, else wget. The installer uses curl when it is installed, held to HTTPS and TLS 1.2 or later. wget is the fallback, and it cannot refuse a redirect to plain HTTP, so a wget download counts as transport that is not guaranteed HTTPS. That changes nothing about what is used: the SHA-256 written into the installer decides, and with cosign the signature is checked the same way.
The 50 MiB cap holds on both. curl refuses a larger file up front, and the installer stops with error: Could not download the bundle.; wget stops at the cap:
error: https://… is larger than a release's file is.
Nothing is left behind either way.
The deployment's own proxy. The installer hands the proxy to ./byodt setup as its --https-proxy, so setup writes it into .env as HTTPS_PROXY, and, at a terminal, asks for the hosts to reach directly and a TLS-inspecting proxy's CA. A login from your shell is saved into .env.secrets only after you answer y to Save the proxy login for user '…' that the installer was given? [y/N], or with --proxy-login-from-env on the installer's command line; with --yes and without that flag, setup says it did not save it. The containers must be able to use that proxy: setup refuses one they cannot, such as 127.0.0.1 (see Configuration → Outbound proxy). At a terminal it asks again; with --yes it stops with The proxy settings were refused (see above). Nothing was changed., and the unpacked folder stays. Run ./byodt setup in it yourself, with the deployment's own proxy settings.
When a deployment is already there
An existing deployment is upgraded, never installed over. With --dir, the installer looks only in that folder. Without it, it looks in the folders the container engine has started this bundle's deployment from, and in the byodt* folders of the directory you run it from.
| What it finds | What happens |
|---|---|
| One deployment, on another release | At a terminal, it asks Upgrade the deployment in … from A to B? [y/N]. Without one, or after n: There is a deployment in …. Upgrade it (--upgrade), or name another folder for a new one with --dir. Nothing was changed. |
| One deployment, already on this release | The deployment in … already runs release X.Y.Z; '…/byodt update' applies it again. To install another one, name its folder with --dir. Nothing was changed. |
| One deployment, on this release, set up but never started | The deployment in … already holds release X.Y.Z, and has not been started yet; '…/byodt up' starts it. To install another one, name its folder with --dir. Nothing was changed. |
| An upgrade to this release half done there | An upgrade is half done in …. '…/byodt upgrade' goes on with it, or '…/byodt upgrade --abandon' undoes it. Nothing was changed. |
| More than one | It lists them: More than one deployment was found (above). Name the one to upgrade with --dir. |
| The target folder exists, and is not a deployment | … already exists. Choose another folder with --dir, or upgrade the deployment in it (--upgrade); a folder a refused setup left behind holds nothing yet, and can be removed. |
An upgrade started by the installer is described in Operations → Upgrading to a new release. Every refusal is in Troubleshooting → Installing and upgrading.
Folders other accounts can change
The installer, ./byodt setup, and ./byodt upgrade act only on folders that are yours (or root's) and that no other account can write to. The deployment holds its own data and secrets, and runs code from its folder. A folder whose group may write counts as one other accounts can change, unless the group is your own private group: the group named after you, which many Linux distributions give every user, and which makes new folders group-writable by default (a umask of 002). A shared folder such as /tmp is refused:
error: Other accounts can change /tmp; install where only you can (--dir). The deployment holds its own data and secrets, so a shared folder such as /tmp is the wrong place for it anyway.
To fix a folder of your own: chmod go-w <folder>.
Set up with ./byodt setup
./byodt setup is a bundle's first run: it asks for the settings that are hard to change later, shows the third-party notice, and writes .env. The installer runs it for you. After a manual download, run it yourself from the bundle directory:
./byodt setup
You can skip it: ./byodt up on a fresh bundle still creates .env with the defaults (see Optional: choose your settings first).
The questions
It asks only at a terminal, and only what no flag answered. ./byodt setup --help lists the flags.
| Question | Flag | Default |
|---|---|---|
Graph database, memgraph or neo4j [memgraph]: | --db memgraph|neo4j | memgraph |
The third-party notice, then Continue? [y/N] | --yes | — |
Keep the database in the engine's named volume? [Y/n], asked only on a VM-backed runtime | --db-data bind|volume | volume there; elsewhere bind, in ./data/<engine> |
Reach the console and the platform from other machines too (binds 0.0.0.0)? [y/N] | --bind 127.0.0.1|0.0.0.0 | 127.0.0.1, this machine only |
Port [3000]: | --port N | 3000 |
Does this machine reach the internet only through an HTTPS proxy? [y/N], then The proxy, as http://host:port: | --https-proxy URL, with no login in it | none |
More hosts to reach directly, comma-separated (empty for none): | --no-proxy LIST | none |
The proxy login as user:password, the password percent-encoded (empty for none):, typed without echo | none: a login is never a flag. --proxy-login-from-env takes it from BYODT_SETUP_PROXY_USERINFO, as the installer passes it | none |
The CA certificate file of a TLS-inspecting proxy (empty for none): | --proxy-ca FILE | none |
Start the stack now? [y/N] | --start, --no-start | no |
The proxy's hosts, login and CA are asked only when there is a proxy. --yes asks nothing: every question no flag answered takes its default, and the notice counts as confirmed.
Without a terminal and without --yes, setup refuses at once:
error: setup asks its questions at a terminal. Without one, add --yes, with flags for anything other than the defaults ('./byodt setup --help'). Nothing was changed.
What it writes
| File | What |
|---|---|
.env | A copy of .env.example, with your answers set where a hand edit would put them: DB_ENGINE, FRONT_DOOR_BIND, FRONT_DOOR_PORT, DB_DATA or NEO4J_DATA for the named volume, and HTTPS_PROXY and NO_PROXY for a proxy. |
.env.secrets | Only for a proxy login: HTTPS_PROXY_USERINFO, mode 0600. The database password is generated on the first start, not here. |
proxy-ca/proxy-ca.pem | A copy of the CA file you named. |
.byodt-release | The release and the SHA-256 of every file it shipped. The first upgrade checks your local edits against it. |
third-party-acknowledgement.log | The record of your confirmation of the notice. |
It checks the proxy settings with the same checks every later command makes. Any refusal removes what it wrote, so a refused setup leaves the folder as it was. Setup runs once per folder: it refuses when .env exists (.env exists: this folder is already set up. Edit .env, or move it aside to run setup again.), or .env.secrets does (the folder has run before). Once setup has finished, change a setting by editing .env (see Configuration).
At the end it says what it wrote, and what to watch for:
==> Wrote .env: DB_ENGINE=memgraph, FRONT_DOOR_BIND=127.0.0.1, FRONT_DOOR_PORT=3000.
==> Ready. Start with: ./byodt up
byodt names itself in its messages the way you ran it, so after the installer the line reads ./byodt/byodt up, or the path you gave with --dir.
- Another port than 3000:
Port N: 3000 is a pre-registered loopback address for cloud sign-in; another port may need the identity provider to know it. - A port already in use:
warning: Something already answers on 127.0.0.1:N; the start may fail until it is free. - Bound to
0.0.0.0: a warning that anyone who can reach the port has full access, and, at a terminal,Generate a self-signed TLS certificate now ('./byodt tls generate')? [y/N].
Starting from setup
With --start (or y to Start the stack now?), setup checks before it writes anything that no other folder runs this bundle's deployment (see Operations → A deployment in another folder), then starts it with ./byodt up. It says what the first start downloads:
==> Starting. It downloads the platform and console images, and docker.io/memgraph/memgraph:3.13.2 docker.io/nginx:1.27-alpine, then the embedding model (about 1.26 GB) on the first start.
It names the database and front-door images that are not on the machine yet, and the model's size. It gives no total: the size of an image download depends on what your engine already holds.
Database volumes an earlier deployment left
Every bundle's deployment uses the same compose project name, dethernety, so the named volumes dethernety_memgraph-data and dethernety_neo4j-data outlive a deployment whose folder is gone. Setup looks for them before it writes anything, warns about each one it finds, and never removes one.
A volume this deployment would mount (you chose the named volume for that engine):
warning: The volume dethernety_memgraph-data remains from an earlier deployment of this bundle, and this one would mount it: that graph's database users were made with another password, so its first start would be refused. Before it, set DB_DATA=./data/memgraph in .env to keep the database in a folder instead (less robust on a VM-backed engine); if you no longer need that graph, remove it with 'docker volume rm dethernety_memgraph-data' (this deletes it for good).
The first start would be refused, because the platform would be locked out of that graph. Choose one:
- You want that graph: do not start this folder. Start the deployment it belongs to, or restore a backup of it into this one once this one runs on a folder.
- You do not need it: remove the volume with the command the warning gives. This deletes the graph for good.
- Keep both: set
DB_DATA=./data/memgraph(on Neo4j,NEO4J_DATA=./data/neo4j) in.envbefore the first start, or run setup with--db-data bind.
With --start, setup refuses before it writes anything, and says Run setup with --db-data bind to keep the database in a folder instead.
A volume this deployment does not use:
warning: The volume dethernety_neo4j-data remains from an earlier deployment of this bundle; its graph may still be in it. This one does not use it. To use that graph, stop this one and start the deployment it belongs to ('./byodt up' in its folder); if you no longer need it, remove it with 'docker volume rm dethernety_neo4j-data' (this deletes it for good).
Nothing stops the start. The volume only takes disk space.
The third-party notice
Before your machine downloads any third-party software, the installer and byodt show a short notice. It is Dethernety's own statement of fact about the third-party software this deployment runs: the database image, the front door's nginx image, and the embedding model, where each comes from, and the licence each is published under. Dethernety does not distribute any of them. Your container engine pulls the images from the registries the notice lists, and the platform downloads the model's weights from Hugging Face.
THIRD-PARTY SOFTWARE

This deployment runs the third-party software listed below. Dethernety does
not distribute it: your machine downloads it from the sources listed (your
container engine pulls the images, and the platform downloads the model on
its first start or on './byodt models pull').

- Memgraph (graph database)
  Image:    docker.io/memgraph/memgraph:3.13.2
  Licence:  Memgraph Business Source License 1.1 (with an Additional Use Grant)
  Terms:    https://github.com/memgraph/memgraph/blob/master/licenses/BSL.txt

…the embedding model and nginx, in the same form…

The images also contain operating-system packages under their own licences.

You are responsible for using this software under its licence.

Nothing has been downloaded yet.
Continue? [y/N]
The images it names are the ones this deployment will run, read from .env and compose.override.yaml. The installer, which runs before you choose, lists both databases. When an image points at another repository than the one the release was tested with, a mirror of your own, for example, the notice adds a paragraph that says so.
What confirming means
Answering y, or passing --yes, confirms that you have read the notice and that you are responsible for using that software under its licence. It is not a licence agreement, and the notice does not say it is: it does not accept any publisher's licence for you, and Dethernety grants no rights to software it does not distribute. The licences are the ones the Terms lines link to. --yes counts as the confirmation, and the notice is printed either way.
The record
Each confirmation is one line in third-party-acknowledgement.log, in the deployment's folder: the time (UTC), the notice's text version and SHA-256, the database image, the model, the front-door image, how it was confirmed (tty or yes, or handover-tty or handover-yes when the installer showed it), and the release. It shows that this text was shown and confirmed for this deployment, not who confirmed it.
byodt keeps the record only in a folder that is yours and that other accounts cannot change (see Folders other accounts can change), and counts a record another account could have written as no record. Otherwise it stops before the first download, with a message such as:
error: Other accounts can change this directory (…), so byodt does not record the third-party notice here. Make it yours and not writable by others (chmod go-w .), and run the command again.
When it is shown again
The notice is asked for again only when what you confirmed changes: a new version of its text, another database image (a new tag included), or another model. A new front-door image does not count. ./byodt setup, up, update, restart, models pull and upgrade show it when it is due, before they download or change anything.
On a deployment that has already run, with no terminal and no --yes, a due notice never stops a command: it is printed, followed by warning: The notice above has not been confirmed for this deployment. Run './byodt acknowledge' at a terminal, or with --yes, to record it. On a deployment that has not run yet, the command stops instead, as setup does.
| Command | What it does |
|---|---|
./byodt notice | Prints the notice for this deployment, without asking. --all prints it for both databases, as the installer shows it. |
./byodt acknowledge | Shows the notice, asks, and records your confirmation. Takes --yes. |
./byodt compose … | The raw escape hatch. It never shows the notice, so a pull through it is not preceded by one. |
Get the bundle
To install by hand rather than with the installer: the deployment ships as a signed release asset, a tarball holding the control script, the compose files, and a configuration template.
- Pick the version. The commands below use the current release. For another one, set
VERSIONto it in the next step; the releases are listed on the releases page. - Download the bundle:Shell
VERSION=0.14.0 curl -fsSLO "https://github.com/dether-net/dethernety-oss/releases/download/v${VERSION}/byodt-${VERSION}.tar.gz" - Verify the signature (recommended). Every release asset is signed. With cosign installed, download the signature bundle and check it:Shell
curl -fsSLO "https://github.com/dether-net/dethernety-oss/releases/download/v${VERSION}/byodt-${VERSION}.tar.gz.bundle"

cosign verify-blob "byodt-${VERSION}.tar.gz" \
  --bundle "byodt-${VERSION}.tar.gz.bundle" \
  --certificate-identity "https://github.com/dether-net/dethernety-oss/.github/workflows/release.yml@refs/tags/v${VERSION}" \
  --certificate-oidc-issuer https://token.actions.githubusercontent.com
Result: cosign printsVerified OK. The bundle is the published one, unmodified. The identity is pinned to this exact release tag, so an asset from a different release does not pass. - Extract it and enter the directory:Shell
tar xzf "byodt-${VERSION}.tar.gz"
cd "byodt-${VERSION}"
Result: the directory holds these files (ls -Ashows the hidden ones):Path What it is byodtThe control script — your interface to the deployment. compose.yamlThe service definitions, except the database. compose.memgraph.yaml,compose.neo4j.yamlThe database service, one file per engine. .env.exampleThe configuration template, and the manifest of the tested image set. proxy/The front-door configuration and its TLS entrypoint. README.mdA quick-start reference for the bundle. LICENSE,NOTICEThe licence and the third-party notices. .gitignoreKeeps the files the first start creates out of version control, if you track the directory with git.
Warning: Where you extract the bundle matters. This directory becomes the deployment: your configuration, the database password, and — with the default storage setting — the graph itself all live inside it. Put it somewhere durable and backed up, never in a temporary directory.
Optional: choose your settings first
You can skip this section, and you do not need it after ./byodt setup, which asks for these settings and writes .env for you. Without setup, the first start creates .env from .env.example and starts straight away with defaults that suit a single operator on a trusted machine:
| Setting | Default |
|---|---|
| Front door | Plain HTTP on 127.0.0.1:3000 (loopback only) |
| Database engine | Memgraph |
| Database storage | A host bind mount at data/memgraph |
To change any of these, create .env before the first start — and before ./byodt models pull, which performs the same first-run setup:
cp .env.example .env
# then edit .env
The control script never overwrites an existing .env. Every setting is documented in Configuration.
To run Neo4j instead of Memgraph, add DB_ENGINE=neo4j to .env, or start the first time with:
DB_ENGINE=neo4j ./byodt up
The first start records the engine in .env as DB_ENGINE (and on Neo4j, the image as NEO4J_IMAGE), so later commands need no export. See Configuration → The database engine.
Warning: Choose the database engine before the first start. Each engine keeps its own data and nothing converts one into the other: switching later starts an empty graph, and a backup taken on one engine cannot be restored on the other.
Warning: On a VM-backed runtime (see Requirements), store the database in the named volume, not a host bind mount. A bind mount that crosses the VM's file-sharing layer can corrupt a running database. Set this in
.envbefore the first start:DB_DATA=memgraph-dataOn Neo4j, set
NEO4J_DATA=neo4j-datainstead. On native Linux the default bind mount (./data/memgraph, or./data/neo4j) is fine, and easier to inspect and copy. Switching later means a fresh, empty database. See Configuration → Where the database keeps its data.
Optional: download the embedding model ahead
The platform embeds in process with its built-in model, EmbeddingGemma 300m (embeddinggemma-300m-retrieval-v1, by Google). The weights are not in any image: on the first start, the platform downloads them once from Hugging Face into data/models and verifies them. You can do that step ahead of time — for example while you still have a fast connection:
./byodt models pull
It runs the platform's own download code in a one-off container and needs no database. Before it starts, it prints the model's size and its licence:
Embedding model embeddinggemma-300m-retrieval-v1: 1.26 GB into /models, downloaded only where missing or wrong.
The model is licensed under the Gemma Terms of Use: https://ai.google.dev/gemma/terms.
…
Ready: the platform loads the model from there without downloading it.
- It is safe to run again: it downloads only what is missing or wrong.
Ctrl-Cstops it and keeps nothing partial.- When it prints
Ready, the first start loads the model from disk instead of downloading it.
Note:
models pullperforms first-run setup, so it creates.envwith the defaults if it does not exist yet. Make your settings choices first, or run./byodt setup. On a bundle not set up yet, it shows the third-party notice first.
Note: The model is licensed under the Gemma Terms of Use. The platform logs the licence before it downloads, and
./byodt models pullprints it.
Hosts without internet access
For a host that cannot reach Hugging Face — no internet, or a proxy that does not let the download through:
- On a connected machine, extract the same release and run
./byodt models pull. - Copy its
data/modelsdirectory into the offline host's bundle directory, keeping the<repo>/<revision>/<file>layout intact. - Copy as the account that runs
./byodton the offline host, not as root. Files owned by root pass only under rootful Docker; rootless Podman refuses them. - Keep the files writable only by their owner.
The platform verifies every file's sha256 at start and downloads only what is missing or wrong. It refuses a weight file when any file or directory on its path is owned by another account, or is writable by accounts other than its owner, and names that entry in its error. See Troubleshooting.
Start it
From the bundle directory:
./byodt up
That is the whole installation: the command performs first-run setup, then starts the stack. On a bundle that ./byodt setup has not set up, it first shows the third-party notice and asks you to confirm it; without a terminal, add --yes. Expect output like this:
THIRD-PARTY SOFTWARE
…the notice…
Nothing has been downloaded yet.
Continue? [y/N] y
==> Created .env from .env.example — review it before starting.
==> Container engine: docker (recorded CONTAINER_ENGINE in .env).
==> Database engine: memgraph (recorded DB_ENGINE in .env).
==> Seeded mode/mode.env with the pure open-source defaults.
==> Wrote a new database password to .env.secrets (mode 0600).
==> Starting the stack…
    …your container engine's pull and start output…
==> Up. Console: http://127.0.0.1:3000/console/
==> First start downloads the embedding model once (about 1.26 GB; './byodt models pull' does it ahead) and ingests reference data — './byodt logs platform' and './byodt logs console-init' to follow.
After ./byodt setup, the notice and the Created .env and Database engine lines do not appear: setup did that part.
The Created .env line asks you to review .env, but the start does not wait: it goes ahead with the defaults. If you meant to change a setting first, see Optional: choose your settings first.
Important:
./byodt upreturning does not mean the deployment is ready. It means the containers have started. The platform may still be downloading the embedding model and embedding classes in the background. Use the checks in Verify the deployment is healthy to know when it is done.
What happens on the first start
You do not need to follow this to install, but it explains what you see in the logs and why the first start is slower than later ones.
Setup, before anything starts
| Step | What it creates |
|---|---|
| Configuration | .env, copied from .env.example. The detected container engine is appended as CONTAINER_ENGINE and the database engine as DB_ENGINE, unless .env already sets them. On Neo4j, the image is also recorded as NEO4J_IMAGE. |
| Runtime directories | modules/, schema/, data/, data/models/, data/content-cache/, mode/, tls/ and proxy-ca/ (unless you created it already), plus the database's own: data/memgraph-log/ and data/memgraph/ on Memgraph, data/neo4j-logs/ and data/neo4j/ on Neo4j. The data directory is created only for a host bind mount. |
| Database password | A freshly generated password in .env.secrets, mode 0600. It is created once and never regenerated. See Configuration → The generated secret file. |
| Mode layer | mode/mode.env, seeded with the standalone defaults. |
All of this is idempotent. Every later ./byodt up repeats the checks silently, so a deployment that lost a runtime directory repairs itself instead of failing.
The start sequence
sequenceDiagram
  autonumber
  participant You
  participant db
  participant init as console-init
  participant platform
  participant proxy
  participant console
  You->>db: ./byodt up starts the database
  You->>console: starts the console (it depends on nothing)
  db-->>init: healthy — answers a query
  init->>init: check the embedding model, place the schema
  init->>init: download, verify and install the signed modules
  init->>init: ingest the MITRE reference data, then exit
  init-->>platform: completed successfully
  platform->>proxy: started
  proxy-->>You: front door open on port 3000
  Note over platform: In the background: download the model,<br/>load it, embed every class
dbstarts. It counts as healthy only once it answers a query, not merely once its process is up.console-initruns once the database is healthy. It checks that the platform's embedding model is the one this release's MITRE data was embedded with, and stops the start if it is not. It then places the schema, downloads the module payloads for this release, verifies every signature against the pinned release identity, checks each download's digest, installs the modules, and ingests the MITRE ATT&CK, ATLAS and D3FEND reference data. Then it exits.platformstarts only after the database is healthy andconsole-inithas completed successfully. That dependency is declared, so the platform cannot start against an unseeded graph or a stale schema. In the background it then downloads the embedding model's weights (unless./byodt models pullplaced them), loads the model, and embeds every class once — about 0.2 s per class on a 4-vCPU host: 15–20 seconds for the roughly 80 bundled classes, a few minutes with cloud content packages (about 1,200 classes). Matching uses names meanwhile.proxystarts and publishes the front door.consolehas no dependency on any other service, so it starts straight away and can report on the deployment even while the rest is down.
How long it takes
There is no fixed figure: it depends on your connection and disk. As a reference point, on one fresh install the stack was serving within minutes, and the embedding model became ready in under half an hour. The health checks are deliberately patient, so a slow start is waited out rather than aborted. The model download does not hold the start: the platform serves throughout, matching by name until the model is ready.
Later starts skip nearly all of it. The images are cached, the weights are on disk, the classes are already embedded, module payloads whose digest already matches are skipped, and the ingest is skipped when the reference data has not changed. A normal start takes well under a minute.
Follow the progress
./byodt logs console-init     # schema, module install, and data ingest
./byodt logs platform         # model download, load, and class embedding
./byodt logs                  # everything, interleaved
Ctrl-C stops following the log. It never stops the deployment.
If part of it fails
The two halves of console-init fail differently, on purpose:
| Problem | What happens |
|---|---|
| A version, schema, or embedding-model problem | The start is aborted and the platform is not started. A schema that disagrees with the code serving it must not serve, and a model that did not make the reference vectors would not match them. ./byodt up fails with an error ending './byodt logs console-init' says why. |
| A module or data problem | The fault is recorded and the stack still comes up. You get a running deployment with a specific diagnosis in the console, instead of a silent empty one. |
Either way, go to Troubleshooting: every state the one-shot can report is listed there with its fix. For a first start that seems stuck, see It is taking a very long time.
Verify the deployment is healthy
Run all four checks. Each one tests something different.
1. Every service is running
./byodt status
Expected: db, platform, proxy and console are Up, and db, platform and proxy report (healthy). Columns trimmed:
NAME                    SERVICE    STATUS                    PORTS
dethernety-console-1    console    Up 27 minutes
dethernety-db-1         db         Up 27 minutes (healthy)   7687/tcp
dethernety-platform-1   platform   Up 27 minutes (healthy)   3003/tcp
dethernety-proxy-1      proxy      Up 27 minutes (healthy)   127.0.0.1:3000->80/tcp
The console has no health status: its image has no shell to run a health check in. The db and platform ports are internal to the stack; only the proxy publishes one.
console-init is missing from this list, and that is correct. It is a one-shot that has already exited, and status lists running containers only. To see it, include stopped containers:
./byodt status -a
NAME                        SERVICE        STATUS
dethernety-console-init-1   console-init   Exited (0) 27 minutes ago
Exited (0) is success. Any other exit code means it stopped the start; see Troubleshooting.
2. The front door answers
curl -fsS http://127.0.0.1:3000/healthz
Expected: ok
This is the proxy answering for itself, so it succeeds even when the platform behind it is down. That is what makes it useful: it tells a front-door problem apart from a platform problem.
3. The platform and the console are healthy
curl -fsS http://127.0.0.1:3000/health
Expected: a JSON document whose status is healthy, with a services section covering the database, GraphQL, the loaded modules, and the embedder. Formatted and trimmed:
{
  "status": "healthy",
  "version": "0.14.0",
  "services": {
    "database": { "status": "up", "responseTime": 1 },
    "graphql":  { "status": "up" },
    "modules":  { "status": "up", "loaded": 3, "healthy": 3 },
    "embedder": { "state": "ready", "runtime": "onnx", "profile": "embeddinggemma-300m-retrieval-v1" }
  }
}
How to read the result:
| You see | Meaning |
|---|---|
"status": "healthy" | Everything is up and the embedder is ready. |
"status": "degraded" with "embedder": { "state": "downloading" } or "loading" | Normal right after a first start. The platform serves meanwhile, and class search shows Semantic search is unavailable on this deployment — showing name-based matches. Wait, and follow ./byodt logs platform. |
curl fails with an HTTP error | The platform is unhealthy (it answers 503), or not reachable through the front door. See Troubleshooting. |
healthy means the model is ready, but the classes may still be embedding for a short while. Class matching uses names until ./byodt logs platform shows Embeddings resolved. See Matching uses names after a start.
Tip: With
jqinstalled,curl -fsS http://127.0.0.1:3000/health | jq '.status, .services.embedder.state'prints just the two values you are waiting for.
The console has its own probe on the same address:
curl -fsS http://127.0.0.1:3000/console/healthz
Expected: ok
Note: Once you install a TLS certificate, these addresses become
https://, and a self-signed certificate also needscurl -k. See TLS at the front door. After you connect the deployment to the cloud,/healthreports onlystatusand a timestamp, without theservicessection.
4. The console reports a healthy deployment
Open the console:
./byodt console
This prints the console address and, on macOS, opens it in your browser. You can also browse to http://127.0.0.1:3000/console/ directly. In the standalone configuration there is no sign-in: the page loads straight to the Deployment dashboard.
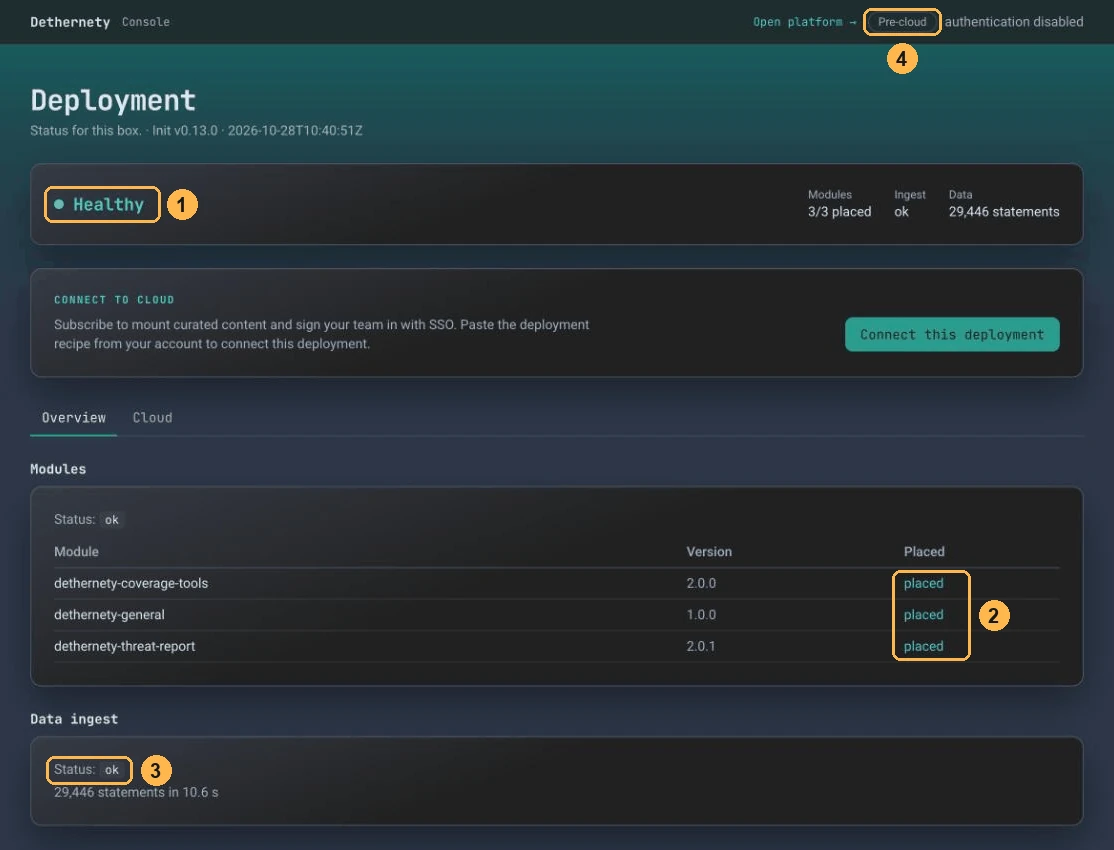
Check each numbered item:
| # | What you should see | What it means |
|---|---|---|
| 1 | A green Healthy verdict at the top. | No failures are being reported. |
| 2 | Under Modules, every module reads placed. | The signed module payloads installed. On later starts they read skipped, which is equally good: the copy on disk already matches. |
| 3 | Under Data ingest, Status: ok, with a statement count in the tens of thousands beneath it. | The reference data loaded into the graph. On later starts it reads skipped-unchanged, which is equally good. |
| 4 | A Pre-cloud badge in the header, top right. | The deployment is running standalone. |
| — | No banners above the tabs. | Nothing needs your attention. The Connect to cloud card is an invitation, not a warning; see Cloud if you want it. |
A Degraded or Fault verdict, or any banner, is explained in Troubleshooting.
Open the platform
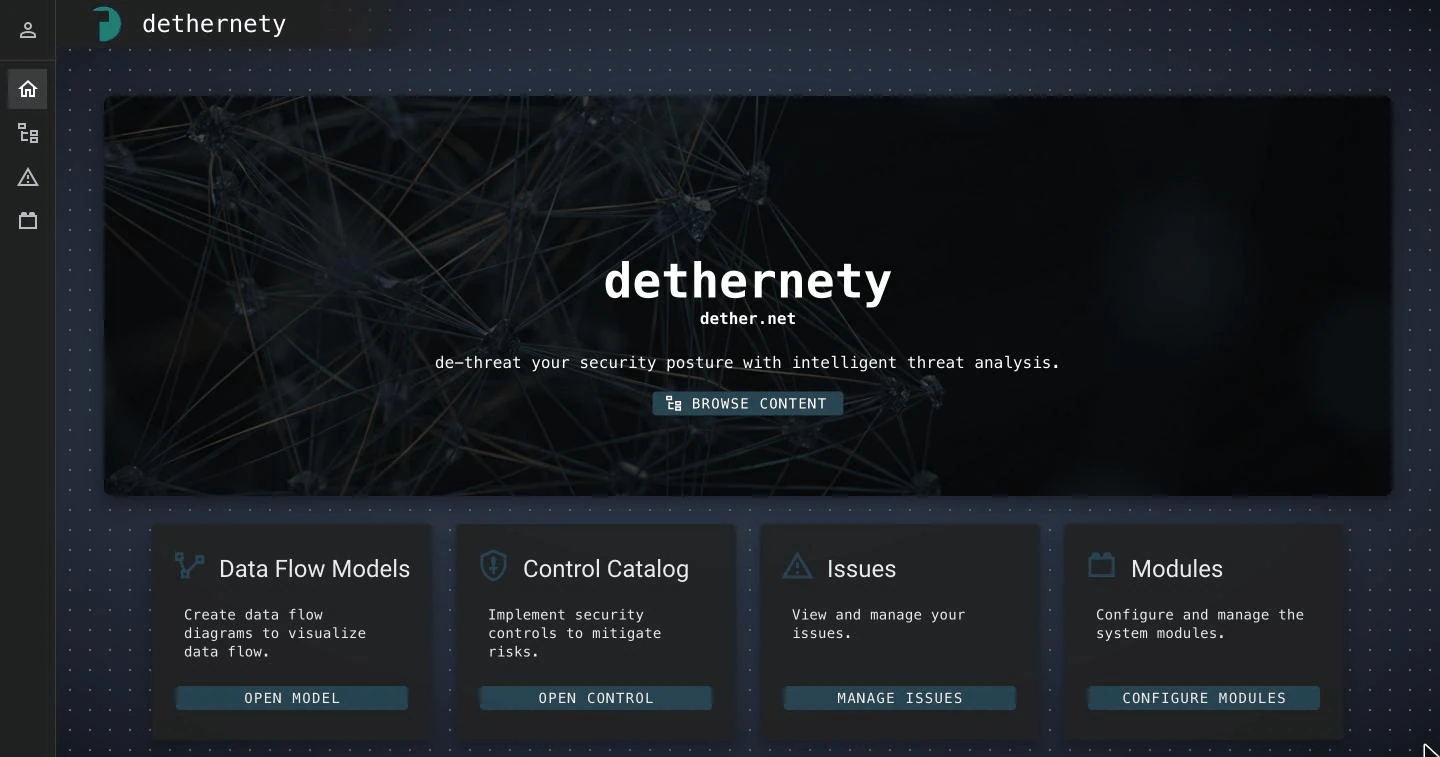
Browse to http://127.0.0.1:3000, or select Open platform → in the console header.
Result: the Dethernety home page loads, with cards for Data Flow Models, Control Catalog, Issues and Modules.
The deployment is installed. Continue with the Quick Start for a first finding in minutes, or Building Your First Model for a full threat model.
Commands you will use
Run these from the bundle directory. ./byodt help lists every command; the full reference is in Operations → Command reference.
| Command | What it does |
|---|---|
./byodt up | Start the deployment, and apply changes to .env. Safe to run at any time. |
./byodt down | Stop the deployment. Data is kept. |
./byodt status | Show the running services and their health. Add -a to include stopped ones. |
./byodt logs [service] | Follow the logs of every service, or one: db, console-init, platform, proxy, console. |
./byodt console | Print the console address, and open it on macOS. |
./byodt backup | Back up the graph to backups/. |
./byodt version | Show the control script's version and the pinned release set. |
Next steps
- Build your first model. Follow Building Your First Model.
- Secure the front door. The default is plain HTTP bound to loopback, which suits a single operator on a trusted machine. Anything else — a shared host, access from another machine — should terminate TLS first. See TLS at the front door.
- Set up backups.
./byodt backupcopies the graph out tobackups/— with no downtime on Memgraph; on Neo4j the database stops while it is dumped. Copy the result off the machine, and keep.env.secretssafe too. See Backing up and restoring the graph. - Learn the settings. Configuration documents every value in
.env, and which command applies which kind of change. - Connect the deployment to cloud sign-in and content packages, if you want them. See Cloud.
- If something went wrong, start at Troubleshooting.